The minimum work to have a FreeBSD virtual machine up and running in my home lab:
- Download Virtual Machine Images (amd64 - ftp://ftp.freebsd.org/pub/FreeBSD/releases/VM-IMAGES/10.2-RELEASE/amd64/Latest/ - download VMDK file: FreeBSD-10.2-RELEASE-amd64.vmdk.xz) :

- Unpack the VMDK file and upload into a VMware datastore;
- Create a new virtual machine with "FreeBSD (64-bit)" as the Guest Operating System;
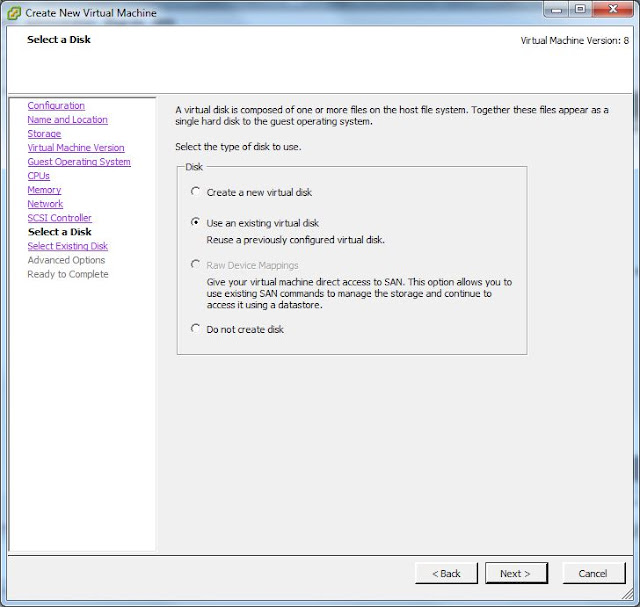
- In "Select a Disk" screen, choose "Using an existing disk" and select the VMDK file from the datastore;
- After completing the wizard, Power On the newly created virtual machine:


Now that the operating system is up and running, some configuration have to be done. For example:
- Set 'root' password;
- Add new users;
- Configure network card to get IP address from DHCP;
- Enable SSH for remote administration;
- Change/increase partitions;
- Change/increase partitions;
- Probably more items in the future.
Setting 'root' password
The initial login using 'root' user will not ask for any password to be entered.
Use the command 'passwd' to set a new password:

Adding new users
It's a good idea to add at least one additional user; using the 'root' for ordinary tasks is not recommended.
Use the command 'adduser' and fill in all required fields.

After creating the user, it's desirable to add it to 'wheel' group:
pw group mod wheel -m admin
Configuring network card to get IP address from DHCP
Initially, when checking the network interface(s) configuration using command 'ifconfig', there will be no inet set for the network adapter (e.g. vmx0):

The hostname and the IP address can be defined in the file '/etc/rc.conf' (system configuration information) as per below:

After a reboot, the auto-assigned IP address is visible as per below:

Enabling SSH for remote administration
Again edit the file '/etc/rc.conf' to enable the sshd service:

or just run the following command:
sysrc sshd_enable=YES
Some configuration related to sshd service can be configured by editing the file '/etc/ssh/sshd_config' e.g. ability to login using root through ssh:
PermitRootLogin yes
PasswordAuthentication yes

References:
- https://www.freebsd.org/cgi/man.cgi?query=hostname&sektion=1
- https://www.freebsd.org/cgi/man.cgi?sshd(8)
- https://www.freebsd.org/doc/handbook/configtuning-rcd.html
- https://www.freebsd.org/cgi/man.cgi?sshd(8)
- https://www.freebsd.org/doc/handbook/configtuning-rcd.html
No comments:
Post a Comment